
Achieving Out-of-this-World Surface Preparation for Polyurea/Polyaspartic Coatings on Concrete Floors
 Polyaspartic coatings are renowned for their rapid cure times, durability, and aesthetic appeal, making them a popular choice for concrete floor finishes in commercial, industrial, and residential settings. However, the exceptional performance of a polyaspartic system (polyurea base coat and polyaspartic top coat) hinges critically on one often-underestimated factor: top notch surface preparation. Without a meticulously prepared substrate, even the highest quality polyaspartic will fail prematurely, leading to delamination, bubbling, and an unhappy client. At Galaxy Concrete Coatings, we do it right..every time!
This article details the comprehensive process involved in achieving a best-in-class surface preparation on concrete floors for polyaspartic coatings, ensuring optimal adhesion and longevity.
Why Surface Preparation is Paramount
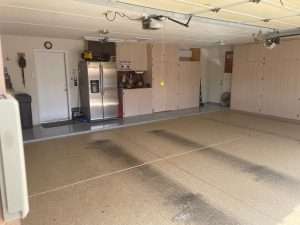
Concrete is a porous material that can harbor a variety of contaminants, including oils, grease, curing compounds, sealers, efflorescence, and laitance (a weak, powdery layer of cement and fine aggregates that rises to the surface during concrete finishing). Polyurea/Polyaspartic coatings require a clean, porous, and mechanically sound surface to bond effectively. Inadequate preparation can lead to:
- Delamination: The coating peeling or flaking off the concrete.
- Bubbling/Blistering: Trapped moisture or air expanding beneath the coating.
- Poor Adhesion: Insufficient bond strength, leading to premature wear.
- Discoloration: Contaminants leaching through the coating.
- Uneven Finish: Irregularities in the concrete telegraphing through the coating.
The Best-in-Class Surface Preparation Process: A Step-by-Step Guide
 Achieving best-in-class preparation is not a shortcut; it's a systematic approach that prioritizes thoroughness and quality control at every stage.
1. Initial Assessment and Planning
- Concrete Condition Assessment:
- Age of Concrete: New concrete requires adequate curing time (typically 28 days) to minimize moisture content and ensure full strength.
- Existing Coatings/Sealants: Identify any existing coatings, sealers, or adhesives. These will need to be completely removed.
- Contaminants: Look for oil stains, grease, paint spills, or other chemicals.
- Cracks and Damage: Note any cracks, spalling, or areas of deteriorated concrete that require repair.
- Moisture Testing: This is critical. Use an accurate moisture meter (e.g., calcium chloride test, relative humidity probe) to ensure the concrete's moisture content is within the polyaspartic manufacturer's specifications. High moisture can lead to osmotic blistering.
- Site Evaluation: Assess ventilation, temperature, and humidity. Optimal conditions are crucial for both preparation and coating application.
- Define Profile Requirements: Polyaspartic coatings typically require a concrete surface profile (CSP) of CSP 2-3 as per ICRI (International Concrete Repair Institute) guidelines. This level of profile provides sufficient anchor for the coating without being overly aggressive.
2. Mechanical Surface Preparation: The Heart of Best-in-Class
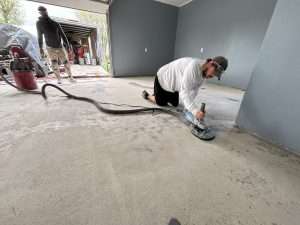 This is where the majority of the work and precision lies. The goal is to achieve the specified CSP, remove laitance, and eliminate contaminants embedded within the concrete matrix.
- Diamond Grinding:
- Process: Preparation includes diamond grinding either by hand or by our 24 inch 300 pound grinder (depending on access and size of the concrete space). Proper preparation is paramount to achieving the greatest possible adhesion. The grinding removes about a business card's thickness of the concrete, to remove any previous coatings and the sealer. This opens the pores of the concrete allowing our base coat to root in. Dust is minimized by having all grinders hooked up to vacuum systems. We then use Penntek's mender to fix pits, cracks, or spalls that are present before the coating process begins. This process cures quickly and still allows for a 1 day installation.
- Benefits: Excellent for removing thin coatings, adhesives, and leveling minor irregularities. Can achieve a fine profile (CSP 1-2). Often used for edge work, small areas, or as a follow-up to shot blasting to refine the profile.
- Scarification (For Heavier Material Removal):
- Process: Uses rotating flails or cutters to chip away at the concrete surface.
- Benefits: Best for removing thick coatings, mastic, or severely damaged concrete. Can achieve higher CSPs (4-6+).
3. Crack and Spall Repair
- Routing and Cleaning: All cracks should be routed out to create a clean, inverted "V" or square-cut profile to provide a good key for the repair material. Thoroughly clean out dust and debris.
- Filling: Use a high-quality, fast-setting polyurea crack filler specifically designed for concrete repair. Ensure the filler is compatible with polyaspartic coatings. Overfill slightly and then grind flush with the surrounding concrete once cured.
- Spall Repair: Larger spalls or damaged areas should be patched with a suitable concrete repair mortar, ensuring it cures to a strength comparable to the surrounding concrete.
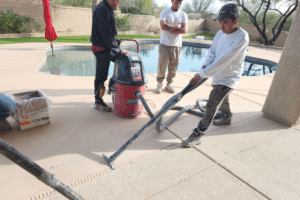
4. Thorough Cleaning and Dust Removal
 This step is absolutely critical and often overlooked.
- Vacuuming: Use industrial-grade HEPA-filtered vacuums to remove all dust, debris, and fine particles generated during mechanical preparation. This is not a job for a shop vac. Multiple passes are essential.
- Wiping/Sweeping (Optional but Recommended): For critical applications, a final wipe-down with a clean, lint-free cloth or a light sweep with a soft-bristled broom can help ensure all residual dust is removed.
- Inspection: Visually inspect the surface for any remaining dust or debris. The surface should be impeccably clean.
5. Final Inspection and Profile Verification
Before any coating is applied, a meticulous final inspection is non-negotiable.
- Visual Inspection: Check for uniformity of profile, absence of laitance, oil stains, or other contaminants.
- Tactile Inspection: Run your hand over the surface to feel for smoothness or irregularities.
- Adhesion Test (Optional but Recommended for Critical Jobs): A pull-off adhesion test (ASTM D7234) can quantitatively measure the bond strength of the prepared surface. While not always practical for every job, it provides invaluable data for critical applications.
- Moisture Re-Verification: Re-check moisture levels just prior to coating, especially if there has been a delay or change in environmental conditions.
 Achieving best-in-class surface preparation for polyurea/polyaspartic coatings on concrete floors is a multi-faceted process that demands attention to detail, the right equipment, and skilled execution. It's an investment in the longevity and performance of the coating system - a practice Galaxy Concrete Coatings follows every day. By meticulously following these steps – from initial assessment and cleaning to precision mechanical preparation, diligent repairs, and exhaustive dust removal – applicators can ensure optimal adhesion, prevent premature failures, and deliver a truly durable and aesthetically pleasing polyaspartic floor that stands the test of time. Skipping or rushing any of these steps inevitably compromises the final result, making best-in-class preparation not just a recommendation, but a fundamental requirement for success.